User Tools
Sidebar
Navigation
software:gui-designer:system-manager:commands
This is an old revision of the document!
Table of Contents
Commands
Overview
Commands are actions which you add to a System, and then assign to a button, slider, gesture or timer to control a particular device.
Creating Commands
To create a command, you first have to create a system. The system defines where the command will be sent to, whilst the command simply defines what content will be sent in the message.
Once you have created a system, the next step is to create the command and assign it to a button.
- Select the system to assign the new command to by highlighting it in the System Manager tree (you can manually set this in the following steps also).
- Click the 'Add Command' button in the System Manager toolbar

- Check the correct system is selected in the drop list
- Give the command a name. In the below example the command is for toggling statusbar, so we called it “Statusbar Toggle”
- Enter the command value. In the below example the command is designed for show/hide the statusbar.
- Press OK and you will see the command added to the System Manager tree, under the chosen system.
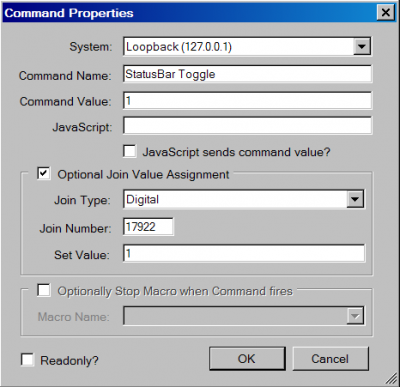
Optional Target Value Assignment
When a command is sent, you can also optionally assign the value of a target join.
To do this, firstly select the checkbox to enable the other properties. Then select the join type from the dropdown list.
Now enter the join number you want to target and finally enter the value you want to assign to the join.
This is handy for many reasons, such as changing an image path, changing a text value or changing a button state.
The value can contain token replacements and math expressions.
Optionally Stop Macro when Command Fires
This will stop all running macros when the command is fired when the checkbox for this option is selected.
Assigning Commands
Commands can be assigned to buttons, sliders, macro, input field, page timers and gestures . Here we will show how to assign the commands to these objects.
You will of course first need to create a command following the steps above.
Assigning Commands to Buttons
- Open the page containing a button you want to assign the new command to.
- Now click and hold on the command in the list and drag it onto the button. You will see the buttons becomes highlighted green, indicating the command can now be dropped
- Release the mouse button and the command is now assigned to the button.
- Alternatively you can double click on any button and assign the command in the Button Properties dialog.
In the button properties dialog you can also set the command repeat delay. This delay time (entered in milliseconds) represents how often the command will be sent whilst the button is held down.</br> Enter zero for no repeating.
Assigning Commands to Sliders
Sliders allow sending commands on press, drag and release. Each action can be assigned a separate command via the Slider Properties dialog.
The command being sent can also include the slider value. To do this the command value needs to use a special string sliderval
The sliderval string will be replaced with the slider value when the command is sent. The slider value being sent can be manipulated by entering the min and max values within the Slider Properties dialog.
So setting the min to 0 and max to 100 will allow you to send a command with the values from 0 to 100 when dragging the slider from left to right (or bottom to top for vertical sliders).
Leaving the min and max empty will send the default slider value range of 0 to 65535.
The value can be sent as either a decimal value, hex value or hex string value (within the Slider Properties dialog).
- Decimal mode just sends the value as a normal string
- Hex mode sends the value in hex bytes, so 0 to 100 would be sent as x00 to x64
- Hex String mode sends the value as the ascii representation of the hex value, so for 0 to 100 it would send 00 to 64.
To assign the various commands, double click on a slider to open the Slider Properties dialog and select the commands for the press, drag and/or release actions.
Assigning Commands to Macros
Go to Macros for more details.
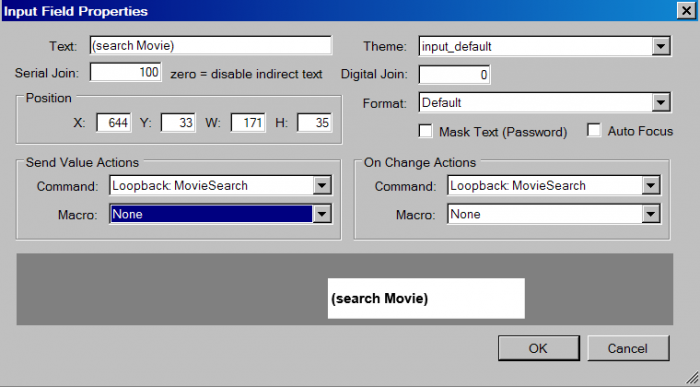
Assigning Commands to Input Field
- Use the Input Tool to create an input field.
- Double-click the input field that has been created to go into Input Field Properties.
- Assign Commands to either the “Send Value Actions” or “On Change Actions” part.
Commands for “Send Value Actions” will only be run when the full input string is entered and when the “Done” button on the onscreen keyboard (OSK) is pressed. Commands for “On Change Actions” will be run for every individual input key that is typed or changed on the OSK.
Assigning Commands to Page Timers
Go to Timers for more details.
Assigning Commands to Gestures
Go to Gesture Manager for more details.
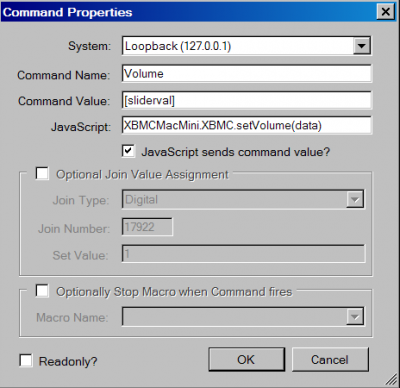
Executing Javascript through Commands
To execute Javascript functions, enter the script at the “Javascript” section under the Command Properties. If you want the JS script to receive and use the values from the Command Values section, make sure the box “Javascript sends command value?” is checked.
Below is an example of controlling the volume of the XBMC server using JS. The “XBMCMacMini.XBMC.setVolume(data)” function is the command that sets the volume where the sliderval string passes the value of the volume to be set via a slider.
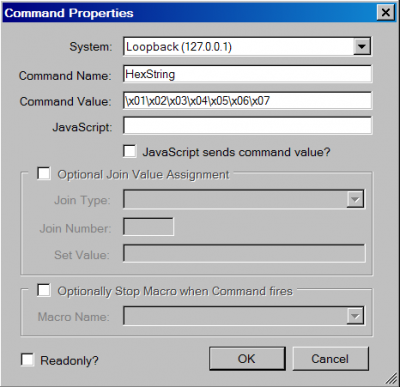
Sending Hex Values through Commands
To send hex strings or values, append a prefix of “\x” to the hex codes and insert at the Command Value section.
HTTP Requests as Commands
Some devices only have a HTTP control protocol. These devices can be controlled from a web browser by entering specific URLs into the browser.
To control these devices via iViewer, the command value to send needs to be crafted to follow the HTTP Request standard formatting.
See the HTTP Request Commands page for more details.
software/gui-designer/system-manager/commands.1415019221.txt.gz · Last modified: 2014/11/03 12:53 by jarrod