User Tools
Sidebar
Navigation
software:gui-designer:gui-designer-basics
This is an old revision of the document!
Table of Contents
guiDesigner Basics
This page provides an overview of the CommandFusion guiDesigner followed by a simple tutorial. It should help new users to acquire the required understanding of the CommandFusion tools and concepts in order to begin working on their own projects.
Overview
Quick Start Video Guide
A quick start video covering the basics of the guiDesigner and iViewer software is available here.
Quick Start Guide Wiki Version
A quick start guide in text wiki format is available here.
Joins and Tokens
CommandFusion understands three different types of data; digital, analog, and serial. Data can be stored in tokens which are assigned a name, and can hold any data type, but cannot be displayed on the GUI. Data that must be displayed on the GUI is stored in joins. Each data type has its own group of 100 joins which are referred to by number and can be used for any purpose. Joins are numbered consecutively from one. There are also some system defined joins which have much higher numbers, and cannot be changed.
Digital joins can hold only a 0 or a 1. They are useful for controlling button states and page flips.
Analog joins hold integers (whole numbers) in the range of 0 to 65535. They are usually used for gauges and sliders.
Serial joins are used to hold text. They can be used to display text for the user, or to specify image paths or URLs for GUI objects.
For more detailed information, see our Joins page.
GUI Objects
The GUI designer allows you define the appearance and behaviour of your user interface through the use of ten different GUI objects. While there are many common properties of the different GUI objects, each one has a set of unique properties that allow it to fulfil a certain set of requirements.
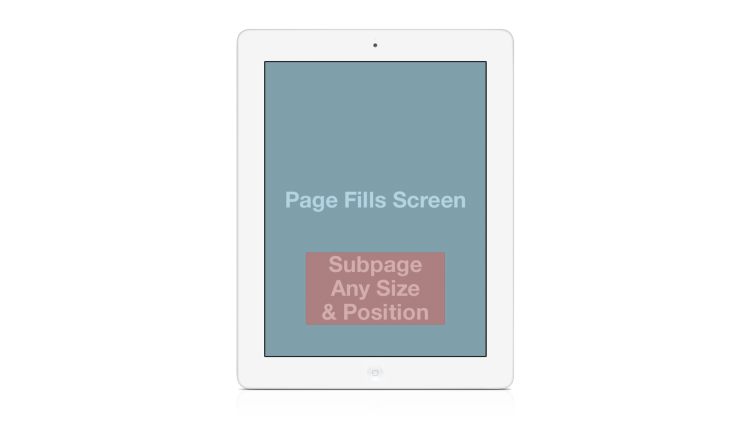
Pages
A page represents the display area of the device that is running the GUI. Multiple GUI objects can be positioned on a page. A project must contain at least one page, however a license is usually required for projects with more than one page. Pages can be switched in response to user interaction, or feedback from external systems.
Subpages
Subpages are like pages, but they are smaller and can be displayed on top of other pages.
Buttons
Buttons can be used to both show system state to the user, and receive feedback from the user. Buttons have two states; active and inactive. Each state is represented by an image and/or text. The states can be automatically toggled when the user interacts with the button, or they can be controlled by feedback from an external system. The button text can be controlled independently of the button state.
For a more in depth look at implementing buttons, see our buttons tool page.
Gauges & Sliders
Gauges provide a way to display a ranged analog value, such as a volume setting or a tank level.
Sliders are similar to gauges, but their value can be adjusted by the user.
Input fields
Input fields provide somewhere for the user to enter text.
Text
Displays static or dynamic text.
Images
Displays an image. The image can either be local to the project, or accessed via a URL (as long as a suitable network connection is available).
Lists
Web Pages
Provides a basic web browser for viewing web pages.
Control Systems
iViewer uses control systems to interface with external equipment. There are two types of control system; external and loopback. External systems communicate by sending messages over the WiFi network. The loopback system sends messages internally within iViewer. iViewer can communicate with multiple external systems, but only one loopback system.
Commands
Commands are messages which are sent to a control system. Commands can be sent as a response to user interaction with the GUI objects, or as a result of feedback processing on messages received from a control system.
Macros
Macros are used to group multiple commands together into a single task, and to apply time delays. Commands in a macro can be sent to different control systems.
Feedback
Messages received from control systems are processed using feedback rules in order to determine what do with them. First the message is analyzed to see if it matches a particular pattern (regex). If the message does not match the pattern, it is discarded. If a match is found, the relevant parts (also defined by the regex) are extracted into capture groups. Capture group rules can then be used to convert these values into a more useful format. Finally OnMatch rules can be used to assign the values of these capture groups to joins or to send new commands.
Themes
The appearance of most GUI objects in the GUI designer is controlled through themes. Each object type has its own theme type. Themes allow GUI objects to share a consistent look, by setting the common properties in a single place.
Tutorial
This tutorial demonstrates how to create a simple GUI using a loopback system to send and receive messages without any external equipment. The tutorial is intended to run on an iPad, but can easily be adapted for an iPhone or other device.
Creating a Project
The first step when working with the GUI designer is to create a new project.
- From the File menu, select New Project, and choose a location to save the project. Once the project location has been chosen, the project properties dialog is displayed.
- Select iPad from the Common drop-down box under page size.
- Click OK.
Add a Loopback System
In order to demonstrate the message processing capabilities of CommandFusion, a loopback system will be used. As mentioned above, this is a special type of control system that does not require any external equipment.
- In the system manager, click on the Add System button.
- Click on Skip Wizard.
- Enter Loopback in the System Name box.
- Enter 127.0.0.1 in the IP Address box.
- Select UDP.
- Click OK.
Define The Commands That Will Be Sent
Hello Command
This command will be sent when a button is pressed, and used to update a text field.
- In the system manager, click on the Add Command button.
- Click on Skip Wizard.
- In the Command Name box, enter Hello.
- In the Command Value box, enter message=Hello, World!
- Click OK.
Goodbye Command
This command will be sent when a button is pressed, and used to update a text field.
Create a new command with the name Goodbye, and the value message=Goodbye, cruel world!
Update Slider Command
This command will be sent when the slider is dragged, and will send the new slider position.
Create a new command with the name Update slider, and the value slider=[sliderval].
[sliderval] is a special token which will automatically be replaced with the value of the slider when the command is sent.
Reset Slider Command
This command will be sent from a button to reset the position of the slider.
Create a new command with the name Reset slider, and the value slider=0
Define The Feedback Items To Process The Commands
Now that the commands have been defined, feedback rules can be created to process the messages as they are received. This system sends two different types of message (there are four commands, but two off them send messages of one type, and two of them send messages of another), so needs two feedback rules.
Message Feedback
The first message is of the format message=sometext, where sometext is the part that needs to be captured, and displayed in a text field.
- Click on the add feedback button.
- Click on Skip Wizard
- In the Feedback Name box, type Message.
- In the Regex box, enter the following
message=(.*) - message= means match the exact text message=.
- . means match any single character.
- * means match the preceding character zero or more times.
- .* means match any single character zero or more times.
- (.*) means match any single character zero or more times, and store the result in a capture group. Because this is the first capture group, it will be stored in capture group 1.
- Click on the Add Group button. A capture group will be added to the list.
- Select the capture group.
- Set the data type to Serial.
- Set the target type to Serial.
- The join number is set to 1. This join has not already been used, so can be left as it is.
- Click OK.
Slider Feedback
The second message is of the format slider=somenumber, where somenumber is the value that needs to be captured, and displayed using a slider and a gauge.
- Click on the add feedback button.
- Click on Skip Wizard.
- In the Feedback Name box, type Slider.
- In the Regex box, enter the following
slider=(\d*) - slider= means match the exact text slider=.
- \d means match any digit (0-9).
- * means match the preceding character zero or more times.
- \d* means match any digit zero or more times.
- (\d*) mean match any digit zero or more times, and store the result in a capture group. Because this is the first capture group, it will be stored in capture group 1.
- Click on the Add Group button. A capture group will be added to the list.
- Select the capture group.
- Set the name to slider.
- Set the data type to Analog.
- Set the target type to Analog.
- The join number is set to 1. This join has not already been used (this is analog join 1, the message command is using serial join 1).
- Click on the Add OnMatch button. An OnMatch item will be added to the list.
- Select the OnMatch.
- Set the target type to Analog.
- Set the join to 2.
- Set the value to
{{65535 - $slider$}}. $slider$refers to the value of the token named slider created by the capture group.- The double curly braces tell the veiwer that this is a mathematical expression which needs to be evaluated.
- Gauges use 0 as 0 % and 65535 as 100 %, so this expression will make the gauge track in the opposite direction to the slider.
- Click OK.
Add The GUI Objects
Create Some Themes
The next step is to add the GUI objects that will send the commands, and display the joins. Before adding the GUI objects though, is a good idea to set up some themes. Themes can be configured later, but it is easier to position the objects if they already have a theme assigned. This tutorial will use themes provided with the GUI designer.
- Select Theme Library from the Themes menu.
- Drag CF Blue (iPad) into the theme manager.
The default font used for this theme is too big for this tutorial, so some adjustments need to be made.
- Expand the Buttons group in the theme manager.
- Double click on btn_sqr.
- In the Text section, change the Size to 12.
- Select Active at the top.
- In the Text section, change the Size to 12.
- Click OK.
Create a Page
- Click on the create new page button on the toolbar. The page will appear in the project browser.
- Right click on the new page and select Page Properties
- Click on the Portrait Theme drop-down box, and select the theme portrait.
- Click on the Landscape Theme drop-down box, and select the theme landscape.
- Click OK.
- Double click on the landscape page node in the project browser.
Buttons
This tutorial will use three buttons. One to send the hello message, one to send the goodbye message, and one - to send the reset slider message.
- Click on the arrow to the right of the Button Tool button on the toolbar.
- Select button_sqr.
- Click on the page to place a button.
- Place two more buttons.
- Press Escape to stop using the button tool.
Now that the buttons have been added, they can be configured. To change a button's settings, double click on it, or right-click and select Button Properties.
Button 1
- Tick the Simulate feedback box (this will cause the button to flip states when the user touches it, without requiring any feedback to toggle the join).
- In the Text box enter Hello.
- On the actions tab select Looback: Hello from the Press Command drop-down box.
Button 2
- Tick the Simulate feedback box.
- In the Text box enter Goodbye.
- On the actions tab select Looback: Goodbye from the Press Command drop-down box.
Button 3
- Tick the Simulate feedback box.
- In the Text box enter Reset.
- On the actions tab select Looback: Reset slider from the Press Command drop-down box.
The Slider
- Click on the arrow to the right of the Slider Tool button on the toolbar.
- Select horizontal
- Click on the page to add a slider.
- Press escape to stop using the slider tool.
- Double click on the slider to see its properties.
- Set the analog join to 1.
- Set the max value to 65535.
- On the actions tab, set the On Drag action to Loopback: Update slider.
- Click OK.
The Gauge
- Click on the arrow to the right of the Gauge Tool button on the toolbar.
- Select horizontal.
- Click on the page to add a gauge.
- Press escape to stop using the gauge tool.
- Double click on the gauge to see its properties.
- Set the analog join to 2.
- Press OK.
Text
- Click on the arrow to the right of the Text Tool button on the toolbar.
- Select Large_C.
- Click on the page to add a text field. The properties will be displayed automatically.
- In the text field type No message.
- Set the serial join to 1.
- Click OK.
- Press escape to stop using the text tool.
- Resize the text field to the full width of the page.
Create The Portrait Layout
- Click on the Rectangular Marquee Tool button on the toolbar.
- Drag a box around all GUI objects on the landscape page.
- Right click on one of the objects and select Copy.
- Double click on the portrait page node in the project browser.
- Right click on the page, and select Pate.
- Re-position the objects as required.
Add a startup command
Analog and digital joins are initialised to 0, and serial joins are initialised to empty. In this tutorial, analog joins 1 and 2 should always have opposite values. Therefore, it is necessary to send the rest command at startup, to prevent both joins from being 0.
- Right click on the loopback system in the system manager.
- Set the startup command to Reset slider.
- Click OK.
Load The Design Onto An iPad
The design is now complete, so can be loaded onto an iPad.
- Save the design.
- Install the CF iViewer app on the iPad.
- Open the Settings app.
- Tap on CF iViewer in the Apps secton.
- Enter the location of your project in the File URL field (the correct value depends on which method you use to distribute your project, see below).
- Make sure that the Reload GUI File option is set to on.
- Press the home button, and open the CF iViewer app.
Choosing a Distribution Method
If you have access to a web server, then this is the most flexible solution. Place the .gui file, and all of the images on the web server, and use the complete URL of the .gui file. For example, if your website is at www.example.com , your project file is called tutorial.gui, and is placed in a folder called cf, the url will be www.example.com/cf/tutorial.gui.
If you do not have access to a web server, then you can use the upload service built into guiDesigner. From the File menu select Upload Service, then click on the Start button (if prompted by your computer's firewall, you must allow guiDesigner to accept incoming network connections). The window will then tell you the URL to enter on the iPad. Note that when using the upload service, you do not include the .gui file name in the URL. For the GUI designer to work, the iPad must be connected to the same local network as the computer running guiDesigner. The upload service will only work whilst the upload service window is open.
Testing The Design
Tapping the Hello button will cause the hello message to be displayed in the text field. Tapping the goodbye button will cause the goodbye message to be displayed. Dragging the slider will cause the gauge to display the opposite value. Tapping the reset button will set the slider to 0 % and the gauge to 100 %.
software/gui-designer/gui-designer-basics.1365380962.txt.gz · Last modified: 2013/04/08 00:29 by aaron