User Tools
Sidebar
Navigation
software:system-commander:quick-start-guide:quick-start-page-4
This is an old revision of the document!
Table of Contents
Quick Start Guide Page 4 - System Commander
A video version of this quick start guide is available here.
Basic Scheduling
The CommandFusion LAN Bridge features an on-board real time clock that allows macros to be performed based on a simple yet powerful scheduling system.
Schedules can be configured to run once off, daily, weekly, or monthly, with customisable options such as days of the week or month, recurrence rates and specific months of the year. There is also a holiday schedule mode to randomly trigger actions in the macro for a set period of time. This can be used to simulate occupancy whilst the homeowner is away.
To demonstrate scheduling, we will configure a schedule to power down a projector and retract a motorized projector ceiling mount at 6pm every weekday.
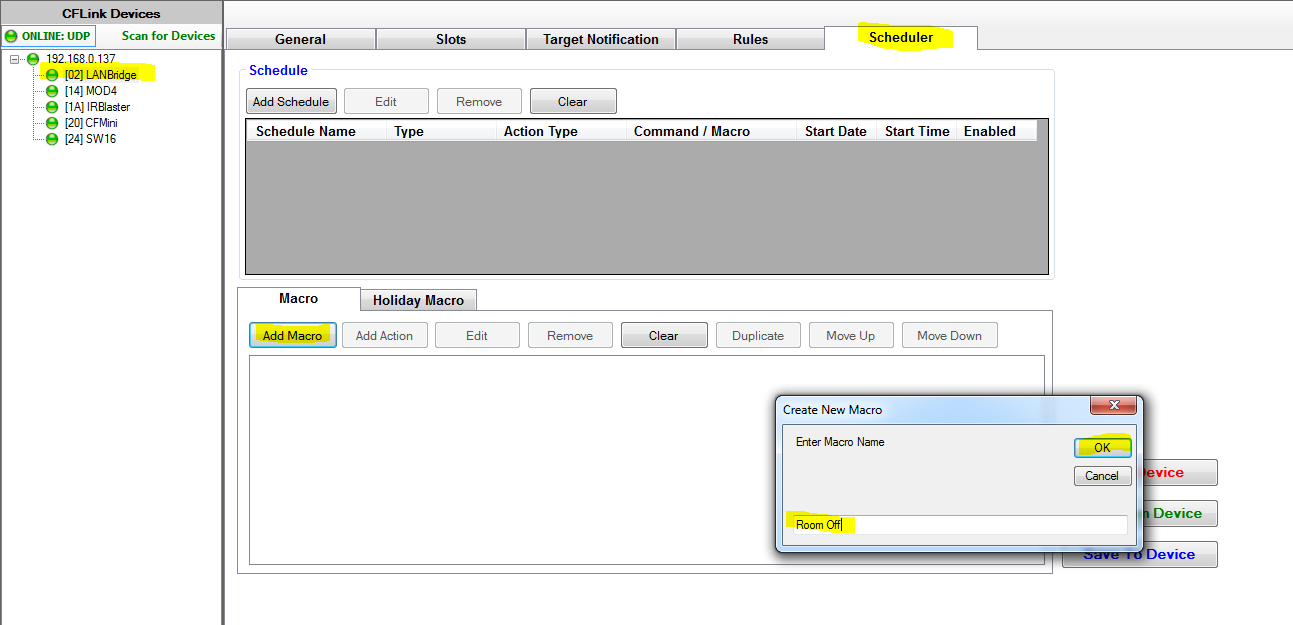
The first step is to create the macro we want to perform. Choose the Scheduler tab for your LAN Bridge and click Add Macro and give it a name. Then click OK
Then we add each action to the macro.
First we want to send an RS232 command to power down the projector. Click Add Action Then click Action Builder and select the On-Board COM action type. The target device in our example case will be the on-board RS232 port of the LAN Bridge. Then enter the RS232 command we want to send and press OK.
The CFLink command will be automatically generated for you.
Press OK again to finish adding the action to the macro.
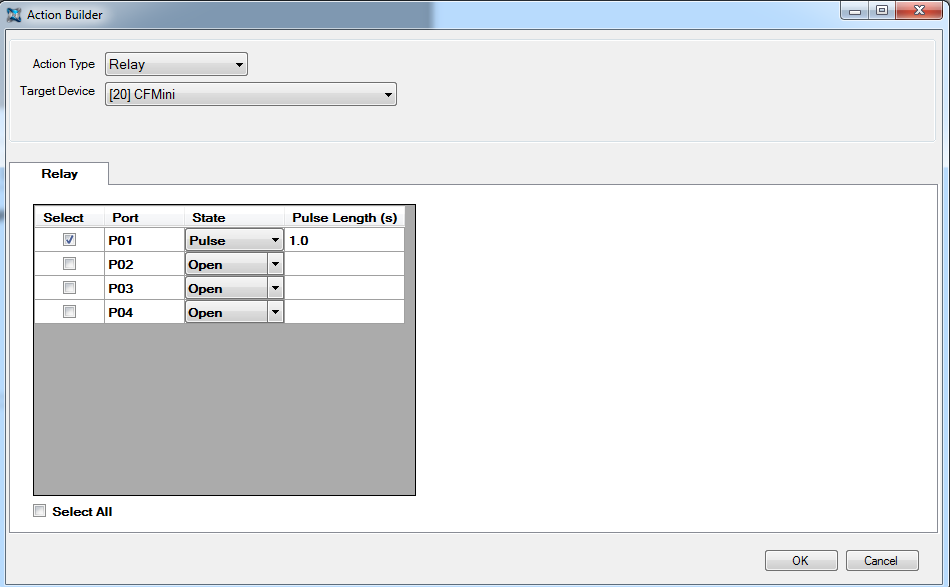
Now repeat the process for the command to trigger the motorized projector mount to retract. In our example case, this is done by pulsing relay port 1 of a CF Mini to close for 1 second. So choose the Relay action type and CF Mini target device, then select port 1 and set it to pulse for 1 second.
Tip: You must select the Relay action type first, otherwise you will not be able to select the CF Mini.
Press OK and again the CFLink command is automatically generated. Pressing OK again will add the action to the macro.
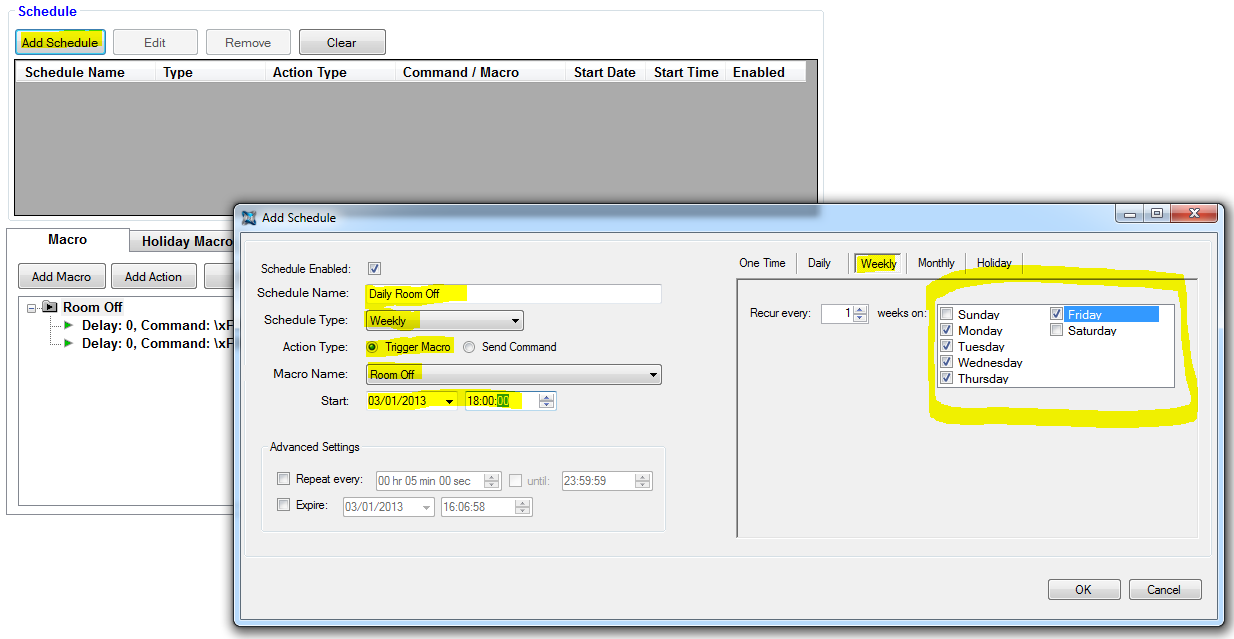
Now that we have finished creating the macro, we need to setup the schedule that will be used to trigger this macro. First click the Add Schedule button. Give it a name related to what the schedule is being used for, in our case Daily Room Off. We want this rule to trigger every weekday, so we select the Weekly tab and tick each weekday, and leave it to recur every week. Next we want to change the action type to Trigger Macro and select the macro we want to perform. Then we input the start date and time. The schedule will recur every week from this start date, so we will just leave it as today’s date. The start time we want to use is 6pm. We do not need to use any of the advanced settings in this example, so leave them disabled. Press OK to finish creating the schedule.
Now that the schedule has been created, we need to save it to the LAN Bridge before it will become active. Click the Save to Device button to start this process. A progress bar will popup just above the communication log to show the save process. Once it’s complete, you can use the Load from Device button to ensure that all schedules were successfully saved to the device.
To test the schedule, you can change the real time clock manually to a time near the schedule start time, and then reset the LAN Bridge for the new time to take effect. Then wait for the schedule time to come around and use the communications log to watch what is happening on the CFLink bus.
Click here to see this section in a video guide.
IR File Management
All CommandFusion hardware with IR ports can send IR codes in a variety of ways:
- Using the on-board IR database,
- Sending IR code strings in pronto hex format or our proprietary IR format,
- Or by uploading IR files to the device and recalling the codes via their function name.
To upload an IR file to a device, the file needs to be created using our IR Learner software. Learning IR commands is covered in a separate quick start guide.
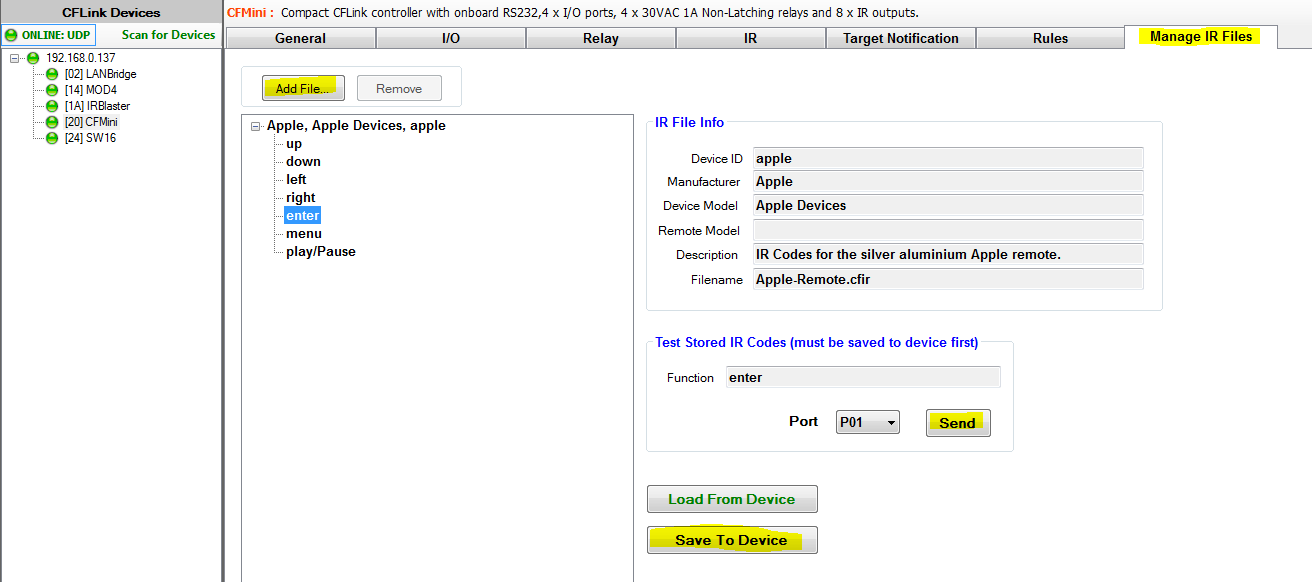
After the IR file has been created, select the device you want to upload it to in the System Commander CFLink Device tree. Then select the Manage IR Files tab. If this tab is not visible, then the device you have selected is not capable of sending IR commands.
Next, click on the Add File… button and browse for the IR file you want to upload. The IR Functions tree will then be populated with a list of the commands stored in the IR File. Before any of these commands can be used, the IR file needs to be saved to the device memory by clicking on the ‘Save to Device’ button. A progress bar will popup above the communication log showing the upload progress. Once this is complete, the IR codes can be tested by selecting a command from the ‘IR Functions’ tree, then selecting a port number from the Test Stored IR Codes area and pressing the Send button.
Test Commands
The Test Command window in the bottom left corner of System Commander can be used to send any CFLink command to devices on the network. This is great for testing specific commands. Any hex bytes you want to send should be entered in the format \x00 to \xFF. See our CFLink protocol documentation for more details.
End of Document
This quick start guide is broken up into multiple pages.
<<Go back to page 3
software/system-commander/quick-start-guide/quick-start-page-4.1357707409.txt.gz · Last modified: 2013/01/09 04:56 by aaron