User Tools
Sidebar
Navigation
software:gui-designer:gauges
Gauge Tool
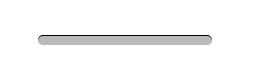
Gauges are GUI Objects that allow you to show the level of something, such as a volume level or a light level. An example is shown below.
To implement a gauge in guiDesigner:
- Select the gauge icon
 on the tool bar.
 - Then draw a box roughly the size of the gauge you wish to use. This size can be edited later on.
- You will then need to add a theme to the gauge. To do this, select a gauge theme from the Theme Library and drag it onto the gauge you just added.
You can also drag a gauge theme directly from the Theme Manager or Theme Library onto an empty spot on an open page, and the gauge will be automatically created at the drop point and assigned the theme you dragged.
Whats the difference between a gauge and a slider?
Good question! A gauge takes a reading from a device/system, and displays the level as a visualisation. A slider is an interactive control that the user can manipulate to change the level of the device/system, as well as displaying a reading the same way as a gauge. Only sliders can show an indicator image or indicator text.
Gauge Properties
To access the Gauge Properties, right click on the gauge and select Gauge Properties. Or simply double click any gauge object within your project.
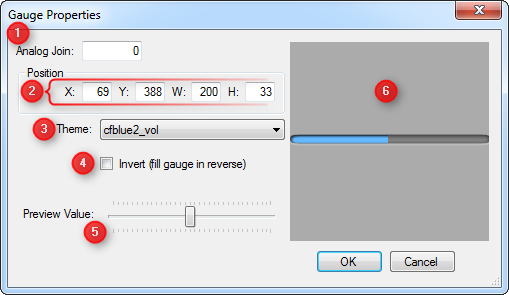
1 - Analog Join
The analog join assigned to a gauge is used to adjust the gauge level. Analog joins have a range of 0 to 65535, which is represented in a gauge as 0 = gauge empty, 65535 = gauge full.
By default the gauge will be assigned an analog join of zero. Before the gauge can show any feedback in the form of the gauge level, it must be assigned an analog join above zero.
2 - Position
This option allows for manual entry of the position and size of the gauge.
- X Position (left of gauge)
- Y Position (top of gauge)
- Width of the gauge
- Height of the gauge
The width and height of a gauge determines if the gauge is rendered in horizontal or vertical mode. When the height is greater than the width, the gauge will render in vertical mode (filling bottom to top). Otherwise, it will be deemed a horizontal gauge (filling left to right).
3 - Theme
Select the gauge theme you would like to use. This choice is derived from the gauge/slider themes you have defined in your project within the Theme Manager.
4 - Invert
Check this box to fill the gauge in reverse. E.g. fill the gauge from the right to left (or from top to bottom in the case of a vertical gauge).
5 - Preview Value
Use this slider to change the gauge fill level in the preview window.
6 - Preview Gauge
This windows shows how the gauge will look in your GUI, showing the value as set in the Preview Value.
software/gui-designer/gauges.txt · Last modified: 2013/04/04 04:09 by aaron